
 |
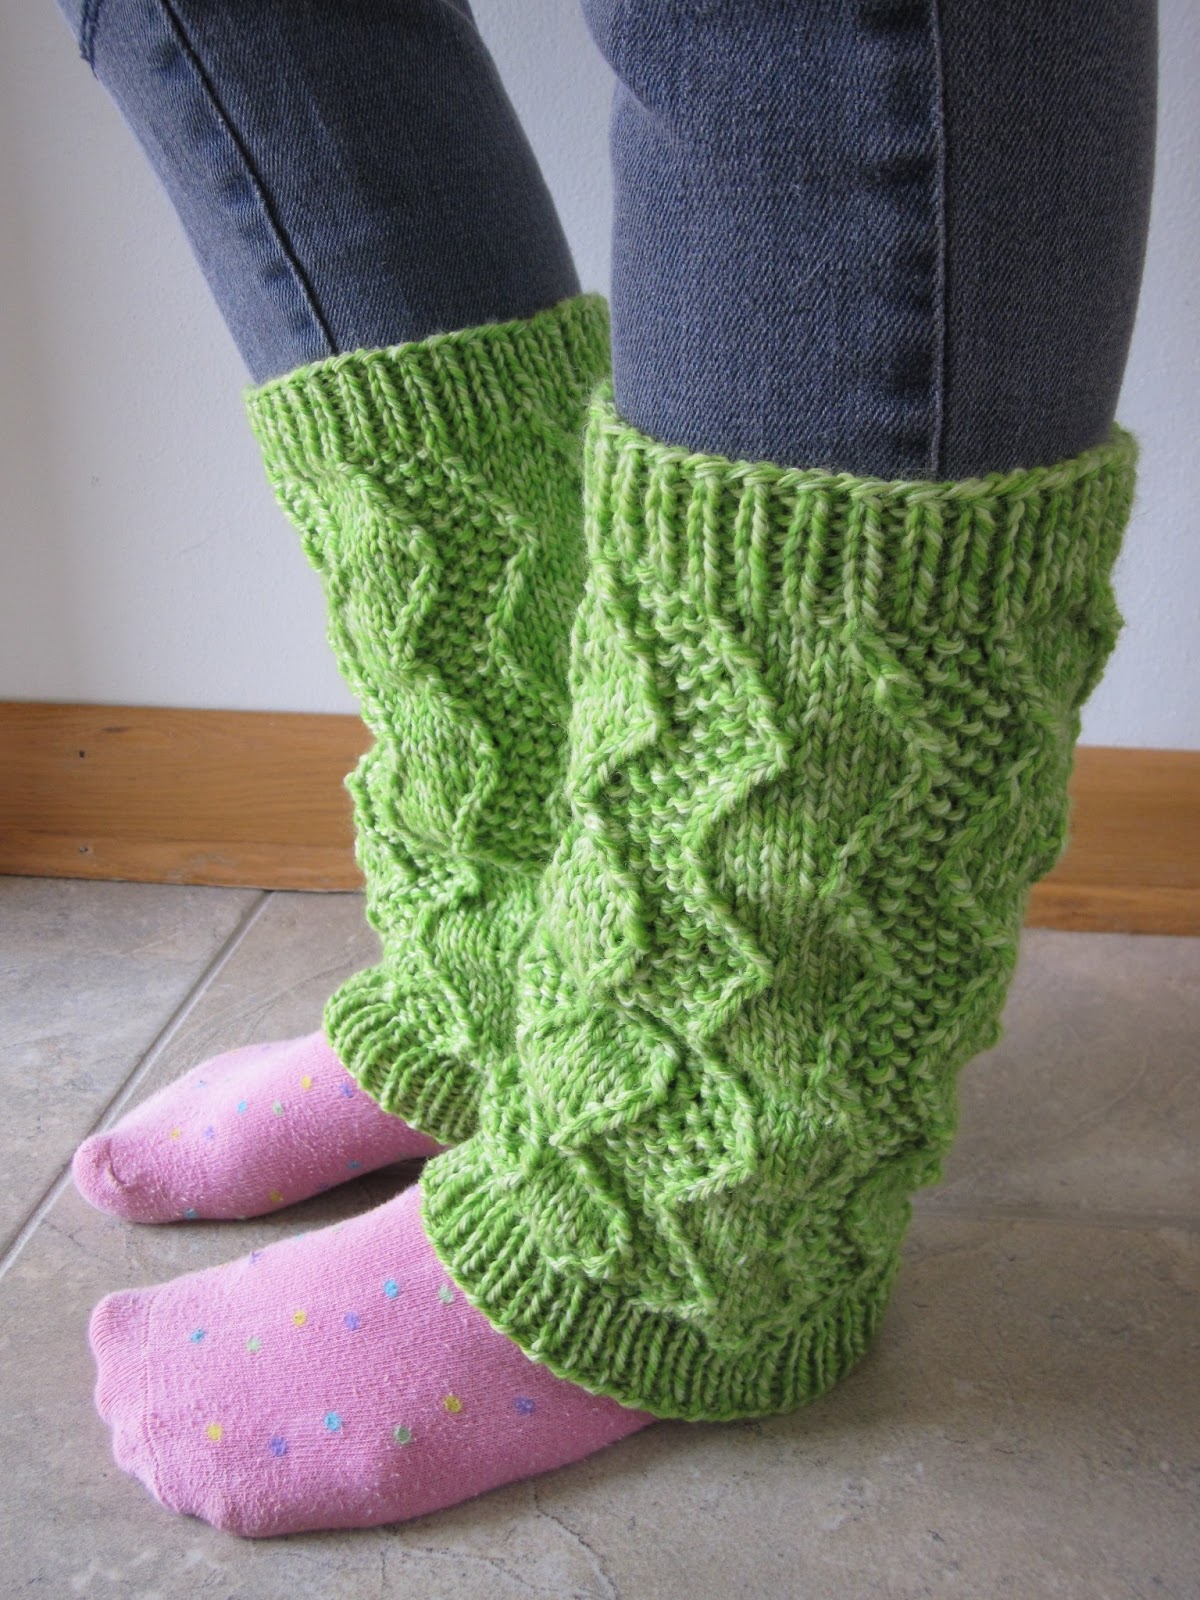
| Zig Zag Legwarmers |
So, in case you can't tell from the socks I'm wearing in this picture, I love me some bright colors. That's probably why I fell in love with this yarn as soon as I saw it. And besides that - well, I wanted a zig zag pattern and I thought it would be cool to change the texture of the stripes (hence the seed stitch). The use of the twisted stitches also adds another interesting dimension to the legwarmers, especially when scrunched up. And finally, each iteration of this pattern (the two zig zag stripes) is 12 stitches in total, which adds 2 inches to the circumference, so these legwarmers are easy to size up and down. As they're knitted, they have a 12 inch circumference and are about 11 inches top to bottom - add 12 more stitches and they'll be 14 inches around, subtract 12 and they'll be 10 and good for a child.
Yarn: Cascade Yarns Quatro (100% Peruvian highland wool; 220 yards [200 meters]/100 grams); #5019 Green Tea - two skeins (I knit almost exactly 1.5 legwarmers with one skein, so you should still have plenty of yarn if you size them up)
Needles: One set of double-pointed needles (dpns) in size 8, one set double-pointed needles in size 7
 |
| A close-up of the pattern. So cheery! |
Notions: Tapestry needle
Gauge: 18 stitches = 4 inches on size 8 needles
Using the size 7 dpns, cast on 72 (60, 84) stitches, divide between three dpns in groups of 12 stitches, and join in round
Knit in p1, k1 ribbing for 1 inch (please note that's purl one, knit one, NOT k1, p1), and then you're going to switch patterns AND needles - it's time to head to the #8's. You'll need the following notation to proceed:
rt (right twist): knit two together, leaving stitches on left-hand needle; next, insert right-hand needle from the front between the two stitches just knitted together, and knit the first stitch again. Finally, slip both stitches from left-hand needle together
lt (left twist): with right-hand needle behind left-hand needle, skip one stitch and knit the second stitch in back loop; then insert right-hand needle into the backs of both stitches and k2tog-b (knit two together through back loops, inserting right needle from the right)
So let's get to it!
Row 1: * k9, p1, k1, p1; rep from *
Row 2: * p1, lt, k4, lt, k1, p1, k1 *
Row 3: * k1, p1, k7, p1, k1, p1 *
Row 4: * p1, k1, lt, k4, lt, p1, k1 *
Row 5: * k1, p1, k9, p1 *
Row 6: * p1, k1, p1, lt, k4, lt, k1 *
Row 7: * k1, p1, k1, p1, k7, p1 *
Row 8: * p1, k1, p1, k1, lt, k4, lt *
Row 9: * k1, p1, k1, p1, k8 *
Row 10: * p1, k1, p1, k1, rt, k4, rt *
Row 11: * k1, p1, k1, p1, k8 *
Row 12: * p1, k1, p1, rt, k4, rt, k1 *
Row 13: * k1, p1, k9, p1 *
Row 14: * p1, k1, rt, k4, rt, p1, k1 *
Row 15: * k1, p1, k7, p1, k1, p1 *
Row 16: * p1, rt, k4, rt, k1, p1, k1 *
Repeat rows 1 - 16 4 times, then repeat row 1 yet again. Switch to size 7 dpns and knit another inch in a p1, k1 ribbing. Bind off loosely, in pattern. Tuck in ends. Finally, although I probably don't have to say this, make another one, for leg #2.


When using straight needles would I follow the pattern as it says? I'm not experienced with knitting in the round or with more than 2 needles thank you.
ReplyDeleteHi there!
DeleteAnd no, this pattern would need to be converted for use with straight needles. Give me a day or two and I'll post it for you! :)
Okay, I think this should do it. I haven't knit it this way, however, and sometimes my brain gets scrambled by the conversion. Let me know if you have any problems, or if things aren't knitting up how they're supposed to and I'll take another look!!!
DeleteUsing your size US 7 straight needles, cast on 74 (62, 86) stitches. Then knit the following ribbing rows:
Ribbing Row 1 (wrong side): p2, * k1, p1; rep from * until you have 1 stitch left in row, end p1
Ribbing Row 2: k2, * p1, k1 * until you have 1 stitch left in row, end k1
Knit these ribbing rows until ribbing measures roughly 1” and you’ve just finished a right side row. Now, it's time to switch to your size 8 needles and your main pattern. You'll need the following notation to proceed:
rt (right twist): knit two together, leaving stitches on left-hand needle; next, insert right-hand needle from the front between the two stitches just knitted together, and knit the first stitch again. Finally, slip both stitches from left-hand needle together
lt (left twist): with right-hand needle behind left-hand needle, skip one stitch and knit the second stitch in back loop; then insert right-hand needle into the backs of both stitches and k2tog-b (knit two together through back loops, inserting right needle from the right)
So let's get to it!
Row 1 (wrong side): p1, * k1, p1, k1, p9 * until you have 1 stitch left in row; end p1
Row 2: k1, * p1, lt, k4, lt, k1, p1, k1 *; end k1
Row 3: p1, * k1, p1, k1, p7, k1, p1 *; end p1
Row 4: k1, * p1, k1, lt, k4, lt, p1, k1 *; end k1
Row 5: p1, * k1, p9, k1, p1 *; end p1
Row 6: k1, * p1, k1, p1, lt, k4, lt, k1 *; end k1
Row 7: p1, * k1, p7, k1, p1, k1, p1 *; end p1
Row 8: k1, * p1, k1, p1, k1, lt, k4, lt *; end k1
Row 9: p1, * p8, k1, p1, k1, p1 *; end p1
Row 10: k1, * p1, k1, p1, k1, rt, k4, rt *; end k1
Row 11: p1, * p8, k1, p1, k1, p1 *; end p1
Row 12: k1, * p1, k1, p1, rt, k4, rt, k1 *; end k1
Row 13: p1, * k1, p9, k1, p1 *; end p1
Row 14: k1, * p1, k1, rt, k4, rt, p1, k1 *, k1
Row 15: p1, * k1, p1, k1, p7, k1, p1 *; end p1
Row 16: k1, * p1, rt, k4, rt, k1, p1, k1 *, k1
Repeat rows 1 - 16 4 times, then repeat row 1 yet again. Switch to your size 7 needles and knit another inch of your ribbing, beginning with ribbing row 2. Bind off loosely in pattern, tuck in ends, and seam. Make another.
Thanks for this!
DeleteYou are very welcome! :)
DeleteIn the beginning of the pattern, it says to divide the 72 stitches on three dpns in groups of 12 stitches; wouldn't that be only 36 stitches in total?
ReplyDeleteHi there!
DeleteYes, 3 x 12 is 36, but I meant to put them in groups of 12, so you can go ahead and put 24 stitches on each needle! :) Let me know if you have any questions!!!
Hi, thanks so much for your reply! Would it be a good idea to use long double pointed needles if I put 24 stitches on each of the three needles then?
ReplyDeleteI used the regular size (or what I consider the regular size, at least - they're about 7" long). You can squeeze 24 stitches into a pretty small amount of space, but of course it all depends on how comfortable you are with keeping them on there!!! :)
DeleteI realized this on my own afterwards but thanks so much for your help!
Delete:)
DeleteI have another question regarding this pattern. Can you use circular needles with this pattern? I am not familiar with using circular needles but would like to try. However, I am not too keen on having a seam to sew at the end of the knitting which it seems I would have to do if I used circular needles. Any suggestions would be greatly appreciated!
ReplyDeleteYou could totally use 9" circulars for this pattern, or the Magic Loop method (google it - there are tons of tutorials and whatnot). And you would definitely not have a seam with circulars - that's the whole point! Anyway, please let me know if you have any more questions - I'm always happy to help!! :)
DeleteHow do I determine what a size 9" circular needle is when I am using needles that I borrowed and were out of the original packaging? Do you measure the circumference of the loop between the needles and if so, how do you do that? Thanks in advance for your help!!! :)
DeleteHi there! 9" circulars are not very common, and they're very noticeable because they are short, and measure (roughly) 9" from tip to tip (so, on the plus side, there's nothing funky about the way you would measure them!). To make this pattern as given, you would need two of them, one in size US 7 & one in size US 8. Unless you have a friend with an incredible needle collection, however, it is doubtful that they will have these in stock, and it would be far more likely that they would have long enough circulars in sizes 7 & 8 for you to use the magic loop.
DeleteIf I'm really misinterpreting your question and you're asking about measuring the needle gauge rather than length, then the best way to do it is to probably buy a knitting needle sizer or even a knitting needle sizer app (apparently they exist!). That way you can figure out how big your needle is around even if the sizing information has worn off!!! :)
Hi! I'm new to knitting & still confused by weight/length of wool & needle sizes, etc. I'm hoping to use a 100% merino Aran 150m/100g, suggesting size 8 needles. I'm planning to resize for 14" calves & to lengthen them as well (5 iterations of the zig zag instead of 4). Will using the slightly thicker?? wool cause sizing problems? �� thanks!
ReplyDeleteHi there! I'm sure there are many good articles out there about yarn weight and sizing, but I will try to distill the basics for you here! :) First and foremost, then, to answer your direct question - aran weight is only slightly heavier than worsted, and can easily be substituted in many patterns, especially if they don't rely heavily on gauge or if you swatch first and make the proper adjustments for size. Or in other words, you can totally use your yarn for this pattern! Probably without modification, although that will need investigation! Another thing to consider (now, or in another project) is that, although yarn labels do give recommended needle sizes, you are by no means limited to those sizes. If you're working with a larger yarn and a pattern designed for a smaller gauge, you can always try using smaller needles - the look of the knitting will change some, but you may get the correct gauge and/or like the effect in the pattern. The same goes for adapting smaller yarns to work in larger gauge patterns - you can hold two strands together, for instance.
DeleteAnother thing to consider is simply your natural knitting gauge - as you knit longer, you will begin to get an idea for how your knitting compares against the gauge given on the package - you may find that you always knit larger, or smaller, and may end up having to adjust needle size to make up for that. Any time you're looking at a pattern, the most important thing is the stitches per inch or four inches, rather than the actual needle size, since there are some who consistently need different needles to obtain gauge!
Oh, and finally, I remember how bewildered I got in the yarn store when I was first starting, and I remember feeling like there was some secret formula for things that I didn't understand. There's not! In fact, depending on an individual knitter's style and how comfortable you are bending the "rules" of the pattern, there's a lot of room to play! And, again, if you're making a pattern that's gauge-sensitive, the most important thing is the stitches per inch, not necessarily how you get there. Okay, now I'm just rambling. :) Let me know if you have any other questions, and good luck!
Ok so I'm nearly finished one... Finally! And it looks brilliant! Thank you for a great pattern & your encouragement above. I am so proud! But have some more (basic!) questions. 1- I need a tiny bit more length on these as mentioned above, but prob not another full iteration.. Would things go totally wonky if I did a half repeat of the pattern (so 4 1/2), just going up to the 8th line? Wd I then still repeat line 1 again? If not I'll just do 5 Iterations as I set out to do. 2- I'm making these because of a long term ankle injury that I need to keep warm. The injured leg is a couple inches smaller around than the normal one. Will it look weird if I make different sizes for my different sized legs & wear them together? I mean my legs look weird anyway, but it's not going to be obvious from the pattern right?
ReplyDeleteHi there! Glad you like the legwarmers. :) And to answer your questions - no, I don't think they'll look weird if you add another half repeat of the pattern, or if you make them two different sizes! Just move to your ribbing after an odd row (so not right after a twist row) and you'll be fine! :)
DeleteAnd thank you thank you thank you again for designing leg warmers! ☺️They are making my life happier & warmer even in summer!
ReplyDeleteWhat would be the best ply to use? Could double knit be used?
ReplyDeleteThanks
Hi there! I used worsted weight, but I think that can be called dk in the UK... In general, if the package recommends the same needle size and gives a similar gauge, it will work! :)
Delete